Guys, this time I will share how to calibrate the Sipart PS2 positioner, assuming the positioner is new so initialization must be done. Here I discuss using auto initialization.
In the auto initialization itself there are the following steps:
- RUN 1: Set the direction of the actuator
- RUN 2: Check actuator travel and adjust open and close positions
- RUN 3: Set and display travel time (leak test)
- RUN 4: Minimization of controller increments
- RUN 5: Optimization of transient response
Automatic Initialization Step
- Enter the 'Configuration Mode' menu, press and hold the 'Operating Mode' button > 5 seconds
- Enter the parameter menu "2.YAGL" select the transmission ratio selector setting
to 33° or 90°.
choose 33° or 90° based on the stroke length as follows;
- Select the "4.INITA" parameter then press the 'Operating Mode' button so that the display appears
- To start the initialization process press and hold the '+' button for more than 5 seconds. so it appears
The positioner performs five initialization steps during the automatic initialization process. The display for the initialization step from "RUN 1" to "RUN 5" is displayed in the bottom row of the display. The initialization process depends on the actuator used.
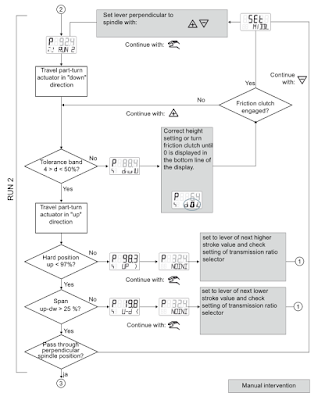
Sometimes the auto initialization step is stopped and manual intervention is required, if the message appears, the following image can be a guide.
Source : Operating Instructions, Electropneumatic positioners SIPART PS2 with 4 to 20 mA/HART
So, hopefully useful... Thank's


0 Comments