Hi friends Iconeer, this time I will share how to make a simple JavaFX program "HelloWorld" using Apache Netbeans.
Tools I use:
- Apache Netbeans IDE 12.1
- Liberica JDK 15
- JavaFX SDK 15
Ok, let's just start coding...
- Create a new project, select 'New Project' --> 'Java With Ant' --> 'Java Application' select 'Next'
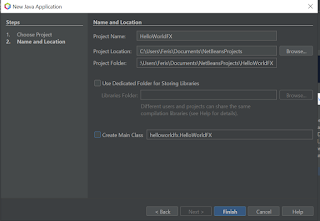
-Name the project name 'HelloWorldFX' , remove the check mark on 'Create Main Class' because we will create our own main class later, then click 'Finish'
-After the project is created, then right click on the 'HelloWorldFX' project --> 'Properties' select 'Libraries' , in the 'Compile' tab add a Claspath by pressing the + button on the right and select 'Add Library' ,
*For those of you who don't know how to add a JavaFX library to Netbeans, please read the article 'Adding a JavaFX Library to Apache Netbeans'.
then select the JavaFX15 library., and click Add Library.
-Still on the Libraries menu, select the 'Run' tab in the 'Modulepath' section, also add the JavaFX15 library as follows. Then click OK
-Next we create a new class with the name 'HelloFX', right click on the default package, then create a new Java class, named 'HelloFX'
Create the following program code:
/*
 * To change this license header, choose License Headers in Project Properties.
 * To change this template file, choose Tools | Templates
 * and open the template in the editor.
 */
import javafx.application.Application;
import javafx.scene.Scene;
import javafx.stage.Stage;
import javafx.application.Platform;
import javafx.scene.layout.BorderPane;
import javafx.scene.layout.HBox;
import javafx.geometry.Pos;
import javafx.scene.control.Label;
import javafx.scene.control.Button;
import javafx.scene.text.Font;
/**
 *
 *
 */
public class HelloFX extends Application {

	public void start(Stage stage){

		Label message = new Label ("Aplikasi Hello FX");
		message.setFont(new Font(40));

		Button helloButton = new Button("Say Hello");
		helloButton.setOnAction(e -> message.setText("Hello World !"));
		Button goodbyeButton = new Button("Say Goodbye");
		goodbyeButton.setOnAction(e -> message.setText("Goodbye..."));
		Button quitButton = new Button("Quit");
		quitButton.setOnAction(e -> Platform.exit());

		HBox buttonBar = new HBox (20, helloButton, goodbyeButton, quitButton);
		buttonBar.setAlignment(Pos.CENTER);
		BorderPane root = new BorderPane();
		root.setCenter(message);
		root.setBottom(buttonBar);

		Scene scene = new Scene(root, 450, 200);
		stage.setScene(scene);
		stage.setTitle("Belajar JavaFX");
		stage.show();

	} //end start();

	public static void main(String[] args) {
		launch(args); //Menjalankan aplikasi
	}
} //end Class HelloFX
- Before running the application, we need to set VM Options, right click on the project, select Properties, select the 'Run' menu, fill in the VM Option following code:
--module-path ${PATH_TO_FX} --add-modules=javafx.controls,javafx.fxml
- Run the project, right click on the project, select 'Run' select HelloFX as the main project then click OK
- Here's how the HelloFX application looks like:
Ok, that's all guys, if you have any questions, please write them in the comments.. Good luck..


0 تعليقات